letsencrypt로 무료 ssl key 발급 후 적용시키기(nginx, certbot)
무료 ssl을 등록시키기 위해
letsencrypt를 사용한다.
먼저 local OSX 환경에서 docker를 이용해 키 발급을 받으려니, 도메인 문제로 실패했다.
아무래도 로컬에 private한 환경이다보니 public 도메인과 연결하는게 여러가지로 상황에 맞지 않았다.
그래서 AWS EC2 인스턴스에서 작업을 했다.(ubuntu)
ec2 접속 관련 명령어는 아래 글을 참고하면 된다.
2023.04.11 - [aws] - aws ec2 비밀번호로 ssh 접속하기
aws ec2 비밀번호로 ssh 접속하기
OS는 ubuntu $ sudo passwd ubuntu 비번 설정 $ sudo nano /etc/ssh/sshd_config (수정) PasswordAuthentication yes $ sudo service sshd restart 접속 시도!
bekusib.tistory.com
[생성]
먼저 이를 쉽게 해주는 코드가 있다. -> https://github.com/wmnnd/nginx-certbot
GitHub - wmnnd/nginx-certbot: Boilerplate configuration for nginx and certbot with docker-compose
Boilerplate configuration for nginx and certbot with docker-compose - GitHub - wmnnd/nginx-certbot: Boilerplate configuration for nginx and certbot with docker-compose
github.com
git clone을 이용해 복제해오면, 아래와 같은 파일 목록이 생긴다.
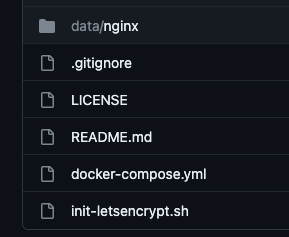
요약하면, docker 환경에서 nginx와 certbot을 실행시켜 ssl 환경으로 한번에 구축하도록 해준다.
- data/nginx/app.conf : nginx conf 파일이 정의되어 있다. 여기서 example.org 부분을 자신의 도메인으로 대체하면 된다.
- docker-compose.yaml : 실행파일이다, 내부에 nginx 환경과 certbot 환경이 명세되어 있다. 딱히 수정할 부분은 없다.
- init-letsencrypt.sh : letsencrypt를 통해 key를 한번에 발급해주는 쉘 명령어 파일이다. 몇가지 코드를 수정해줘야 한다.
먼저 app.conf 파일을 보자
server {
    listen 80;
    server_name youardomain.com;	# 수정
    server_tokens off;

    location /.well-known/acme-challenge/ {
        root /var/www/certbot;
    }

    location / {
        return 301 https://$host$request_uri;
    }
}

server {
    listen 443 ssl;
    server_name youardomain.com;	# 수정
    server_tokens off;

    ssl_certificate /etc/letsencrypt/live/youardomain.com/fullchain.pem;	# 수정
    ssl_certificate_key /etc/letsencrypt/live/youardomain.com/privkey.pem; # 수정
    include /etc/letsencrypt/options-ssl-nginx.conf;
    ssl_dhparam /etc/letsencrypt/ssl-dhparams.pem;

    location / {
        root   /usr/share/nginx/html; # 추가
        index  index.html index.htm;  # 추가
        try_files $uri $uri/ /index.html; # 추가
     #   proxy_pass  http://youardomain.com;
     #   proxy_set_header    Host                $http_host;
     #   proxy_set_header    X-Real-IP           $remote_addr;
     #   proxy_set_header    X-Forwarded-For     $proxy_add_x_forwarded_for;
    }
}
도메인 주소를 바꾸고,
443 서버 부분에서 location / {} 부분을 수정해주면 된다.
init-letsencrypt.sh
#!/bin/bash

if ! [ -x "$(command -v docker-compose)" ]; then
  echo 'Error: docker-compose is not installed.' >&2
  exit 1
fi

domains=(yourdomain.com www.yourdomain.com) # 수정
rsa_key_size=4096
data_path="./data/certbot"
email="" # 입력
staging=0 # Set to 1 if you're testing your setup to avoid hitting request limits

if [ -d "$data_path" ]; then
  read -p "Existing data found for $domains. Continue and replace existing certificate? (y/N) " decision
  if [ "$decision" != "Y" ] && [ "$decision" != "y" ]; then
    exit
  fi
fi


if [ ! -e "$data_path/conf/options-ssl-nginx.conf" ] || [ ! -e "$data_path/conf/ssl-dhparams.pem" ]; then
  echo "### Downloading recommended TLS parameters ..."
  mkdir -p "$data_path/conf"
  curl -s https://raw.githubusercontent.com/certbot/certbot/master/certbot-nginx/certbot_nginx/_internal/tls_configs/options-ssl-nginx.conf > "$data_path/conf/options-ssl-nginx.conf"
  curl -s https://raw.githubusercontent.com/certbot/certbot/master/certbot/certbot/ssl-dhparams.pem > "$data_path/conf/ssl-dhparams.pem"
  echo
fi

echo "### Creating dummy certificate for $domains ..."
path="/etc/letsencrypt/live/$domains"
mkdir -p "$data_path/conf/live/$domains"
docker-compose run --rm --entrypoint "\
  openssl req -x509 -nodes -newkey rsa:$rsa_key_size -days 1\
    -keyout '$path/privkey.pem' \
    -out '$path/fullchain.pem' \
    -subj '/CN=localhost'" certbot
echo


echo "### Starting nginx ..."
docker-compose up --force-recreate -d nginx
echo

echo "### Deleting dummy certificate for $domains ..."
docker-compose run --rm --entrypoint "\
  rm -Rf /etc/letsencrypt/live/$domains && \
  rm -Rf /etc/letsencrypt/archive/$domains && \
  rm -Rf /etc/letsencrypt/renewal/$domains.conf" certbot
echo


echo "### Requesting Let's Encrypt certificate for $domains ..."
#Join $domains to -d args
domain_args=""
for domain in "${domains[@]}"; do
  domain_args="$domain_args -d $domain"
done

# Select appropriate email arg
case "$email" in
  "") email_arg="--register-unsafely-without-email" ;;
  *) email_arg="--email $email" ;;
esac

# Enable staging mode if needed
if [ $staging != "0" ]; then staging_arg="--staging"; fi

docker-compose run --rm --entrypoint "\
  certbot certonly --webroot -w /var/www/certbot \
    $staging_arg \
    $email_arg \
    $domain_args \
    --key-type rsa \	# 추가(중요)
    --rsa-key-size $rsa_key_size \
    --agree-tos \
    --force-renewal" certbot
echo

echo "### Reloading nginx ..."
docker-compose exec nginx nginx -s reload
도메인네임과, 이메일을 입력해주고,
하단에 certbot 명령어에서 --key-type rsa를 추가해줘야한다. (하지 않으면 ECDSA 키로 생성된다.)
자 수정을 모두 완료 했다면,
실행시켜보자,
$ sudo docker-compose up -d


$ sudo ./init-letsencrypt.sh

[확인]
키 확인
$ openssl rsa -in privkey1.pem -check

public key pem 생성
$ openssl x509 -pubkey -noout -in cert1.pem > pubkey.pem
$ cat pubkey.pem

[적용]
RSA로 키가 잘 생성 된 걸 확인했다.
이제 public.pem을 jwks.json으로 변환시켜보자.
chatGPT에서 물어보면 간단할 줄 알았는데,, 자꾸 예전 파이썬 소스코드로 하는 방법을 알려줘서 도돌이표 처럼 에러가 계속 반복됐다.
다행히 online에서 쉽게 할 수 있었다.
https://irrte.ch/jwt-js-decode/pem2jwk.html
PEM to JWK converter
Input -----BEGIN RSA PRIVATE KEY----- MIICXQIBAAKBgQCBG2PAgK0gL/hp7fcqztLzSffY8sUQLhS0FqcEUT0+PNymnhdY M+Bts6Q0L0Fn4mTKrpqg/9SSd8k8j5wi8TogT3ps80azoNx9nvcKrYD1ldN2K646 KozCESAsoVVFRlnnRxqUQ0sbKL3r7qVwOfAt6GH6QSDsBEhOasE7SICMVQIDAQAB AoGAWfQZdmCxP0HtFPFGSz8
irrte.ch
왼쪽에 본인의 public.pem을 넣으면 된다.

jwks.json 파일 생성.

접속 테스트
성공!

소스코드 예제제를 그대로 따라하면,
RSA 키가 아닌, ECDSA 키로 생성이 된다.
키 종류 확인 방법
$ openssl rsa -in privkey1.pem -check
Not an RSA key이 출력되면 ECDSA로 만들어진 키다.